Garden benches · Guide 41
Build a Straight Backless Cedar Slat Garden Bench
Build a 60-inch backless cedar bench with three 2 × 6 seat slats on a braced 4 × 4 leg frame, with an 18-inch seat height for garden use.
01 / See the shape
View the project
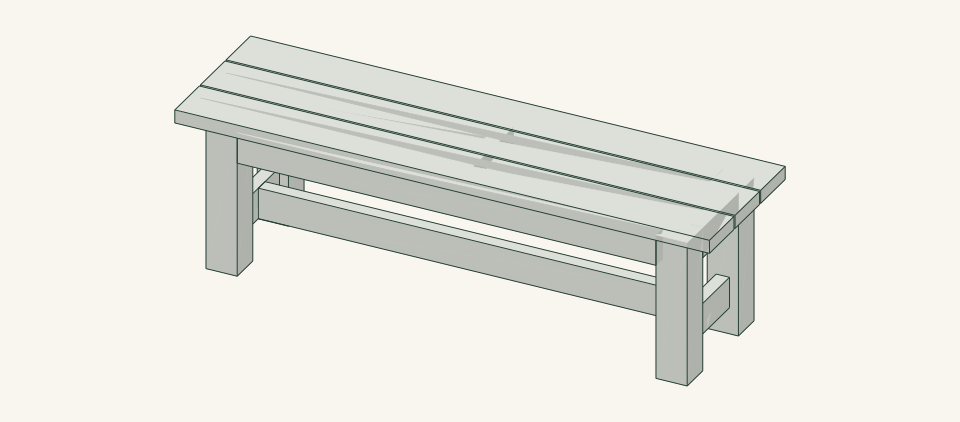
Loading the 3D view…
Drag to turn. Pinch or use + / − to zoom. The written step covers workholding and tool use.
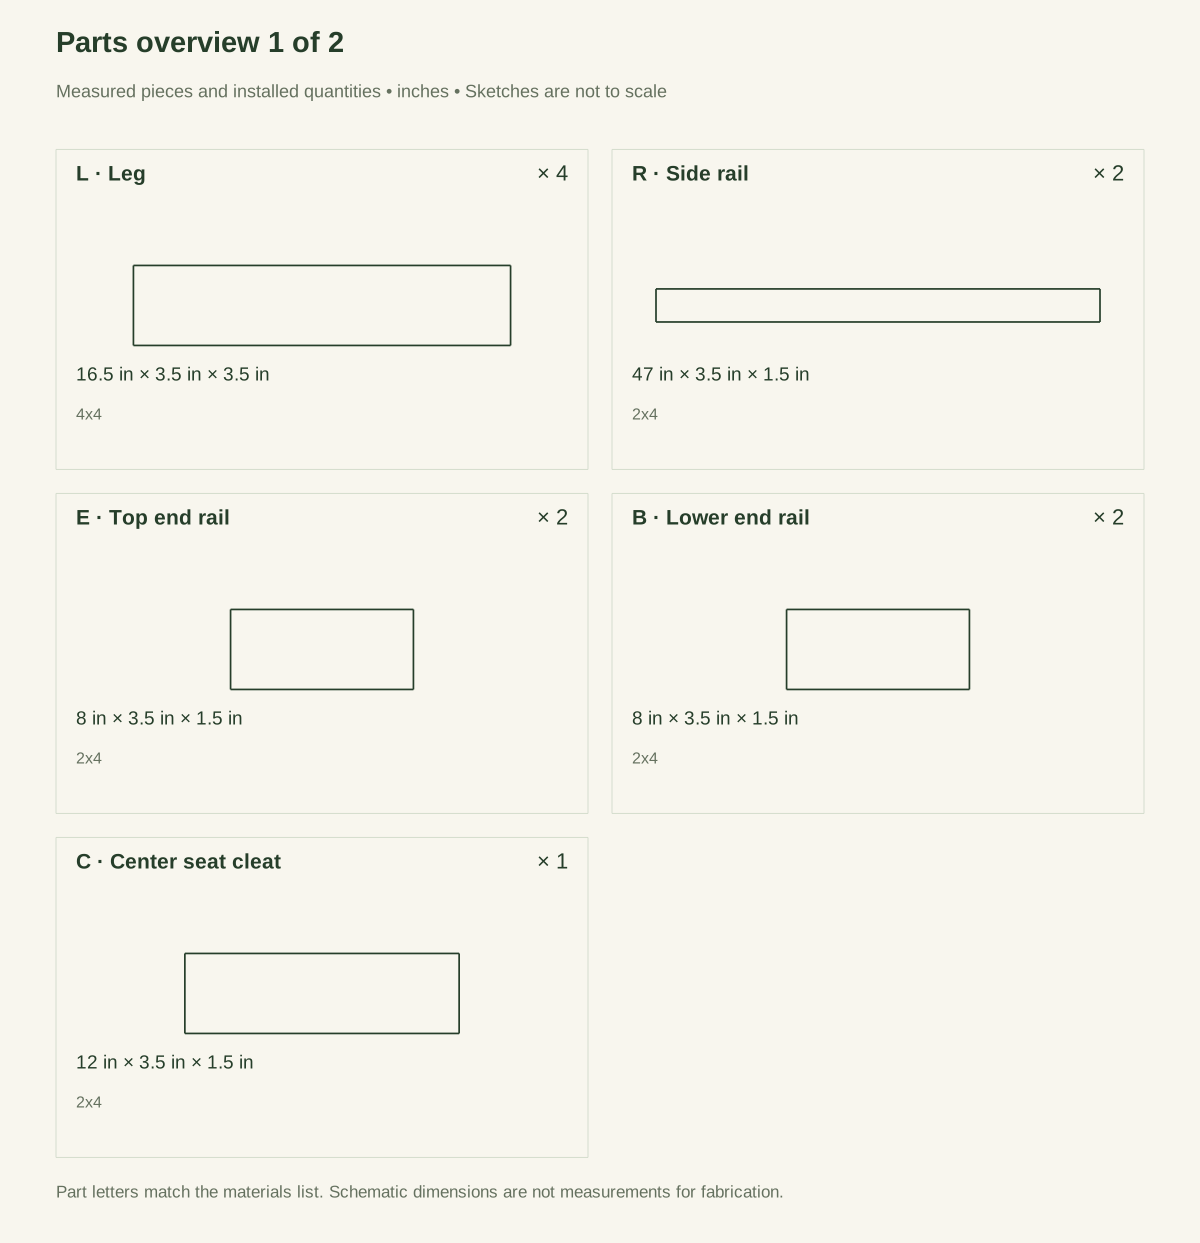
Scroll or swipe the enlarged drawing to read its dimensions. Choose Fit to see the whole drawing again.
Build a Straight Backless Cedar Slat Garden Bench. Check the dimensions and build steps before cutting.
02 / Plan your build
Before you start
The frame sets the four 4 × 4 legs 3 inches in from each slat end and 1 inch in from each long edge. This keeps the feet close under the seat while still holding them inside its outline. Top rails tie the leg tops on all four sides. A center cleat supports the slats at mid-length, and a low H-shaped stretcher braces the legs near the ground against racking. The bench fails if the pocket-screw joints are driven out of square or loosen and let the legs rack. It also fails if slat screws split the slat ends, or if someone sits alone on the 3-inch end overhang where the seat is outside the leg line.
Where it goes
Use the bench on level paving, a deck or firm compacted ground where all four legs bear without rocking. Do not place it on soft soil, on a slope, at a raised edge or beside a drop.
Footprint: Legs stand on a 54 × 15 in rectangle under a 60 × 17 in seat. Allow about 30 in clear on each long side and 18 in at each end for assembly and seating.
What to expect
Measure accurately, make square cuts in 4 × 4 stock and drill clamped pocket-hole joints. Plan 6–8 hours including stock selection, pocket-hole drilling and finish application; finish drying time is extra.
A planning estimate for the hands-on work, once the materials are bought and the tools are set up. It has not been timed on a finished build.
Check the spot
- Confirm a firm, level 54 × 15 in standing area with no drop, step or raised edge within reach of the seat.
- Confirm a flat assembly surface at least 60 × 24 in and room to support 96 in boards on both sides of the cut.
Stop and check first if…
- Stop if any measured section differs from the parts table; different stock changes the cut lengths, so work them out again before cutting.
- Stop if a leg, rail or slat splits at a screw, or if a pocket screw strips; replace the part rather than adding a screw beside it.
- Stop if the frame diagonals differ by more than 0.125 in or the base rocks on a flat surface.
- Do not lengthen the bench, widen the slat gaps or remove C or T: the frame and slat spacing are sized for this bench.
Work safely
- Support 4 × 4 stock fully on both sides of the cut and clamp it; never hold a short leg offcut by hand beside the blade.
- Clamp each workpiece in the pocket-hole jig before drilling and keep fingers clear of the stepped bit.
- Follow the saw, drill and finish manufacturer instructions; keep guards in place and disconnect power before changing bits or blades.
- Lift the assembled bench with two people by the side rails.
- Oily rags from a penetrating finish can heat up and catch fire as they dry. Lay them flat outdoors to dry, or seal them in a metal can filled with water, before you throw them away.
Budget
We have not put a price on this one yet. Lumber and hardware prices change by store and season, so price the list under What you need at your local supplier before you buy.
03 / Gather and cut
What you need
L — Leg
4 pieces
Cedar 4 × 4; actual 3.5 × 3.5 in. One 4 × 4 × 8-ft board: 4 × 16.5 = 66 in plus 4 kerfs of 0.125 = 66.5 in of 96 in.
Measure the actual section before cutting. Reject a leg with a split, a loose knot or wane in the top 4 in where the rails fasten.
R — Side rail
2 pieces
Cedar 2 × 4; actual 1.5 × 3.5 in. Cut one R from 2 × 4 board 1 and one R from 2 × 4 board 2; see the 2 × 4 board layout calculation.
Sight along each rail. Reject any rail with more than 0.125 in bow over its length, because the top edges carry the outer slats.
E — Top end rail
2 pieces
Cedar 2 × 4; actual 1.5 × 3.5 in. Cut both from 2 × 4 board 1.
Pocket holes must be at least 1 in from any knot. Mark the top edge on each piece; it carries the middle slat.
B — Lower end rail
2 pieces
Cedar 2 × 4; actual 1.5 × 3.5 in. Cut both from 2 × 4 board 2.
Same size and hole pattern as E; B sits lower on the legs and 1 in in from their end faces. Mark each piece B before drilling.
C — Center seat cleat
1 piece
Cedar 2 × 4; actual 1.5 × 3.5 in. Cut from 2 × 4 board 1.
Confirm the 12 in length against the measured inside distance between the two R rails before drilling.
T — Lower long stretcher
1 piece
Cedar 2 × 4; actual 1.5 × 3.5 in. One 2 × 4 × 8-ft board (board 3); the 46.875 in offcut is spare.
Confirm the 49 in length against the measured clear distance between the two B rails before drilling.
S — Seat slat
3 pieces
Cedar 2 × 6; actual 1.5 × 5.5 in. Three 2 × 6 × 8-ft boards, one 60 in slat per board, leaving a 35.875 in offcut each.
Choose the straightest, least-knotted faces for the seat. Reject boards with cupping over 0.0625 in or splits within 6 in of either end.
Pocket-hole screws
32 items
2.5 in coarse-thread exterior-rated pocket-hole screws for 1.5 in softwood Buy one box holding at least 32; keep spares separate from the installed count.
Five joint groups: R to L 8, E to L 8, B to L 8, C to R 4, T to B 4. Confirm the coating is suited to cedar and outdoor exposure.
Seat slat screws
14 items
#9 × 2.5 in exterior deck screws, coated or stainless, suited to cedar Buy one box holding at least 14; keep spares separate from the installed count.
S0 4, S1 6, S2 4. Pilot and countersink to the screw maker's instructions.
Exterior finish
1 container
Penetrating exterior wood finish or sealer chosen for cedar Buy one container sized to coat all faces of the parts list twice, per the product label.
Optional. Follow the product label for coverage, drying time and ventilation.
Cut list
| Piece | How many | Cut length | Note |
|---|---|---|---|
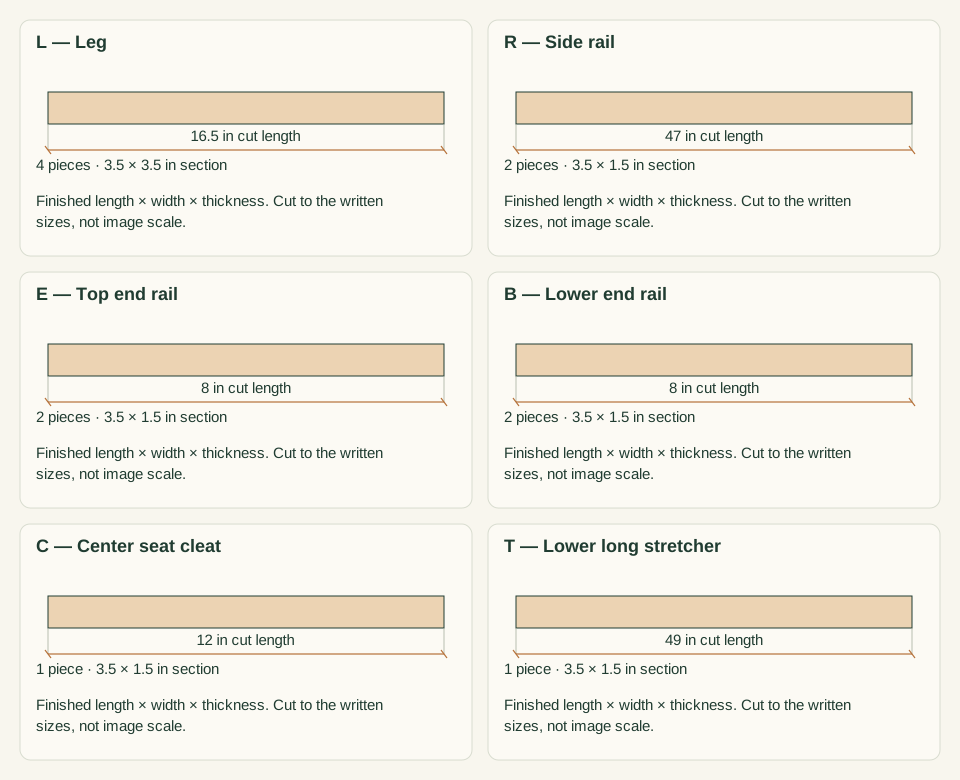
| L — Leg | 4 | 16.5 × 3.5 × 3.5 in | Square both ends. Chamfer the bottom edges 0.25 in after cutting. |
| R — Side rail | 2 | 47 × 3.5 × 1.5 in | Finished length × width × thickness; square ends unless the detail says otherwise. |
| E — Top end rail | 2 | 8 × 3.5 × 1.5 in | Finished length × width × thickness; square ends unless the detail says otherwise. |
| B — Lower end rail | 2 | 8 × 3.5 × 1.5 in | Finished length × width × thickness; square ends unless the detail says otherwise. |
| C — Center seat cleat | 1 | 12 × 3.5 × 1.5 in | Finished length × width × thickness; square ends unless the detail says otherwise. |
| T — Lower long stretcher | 1 | 49 × 3.5 × 1.5 in | Finished length × width × thickness; square ends unless the detail says otherwise. |
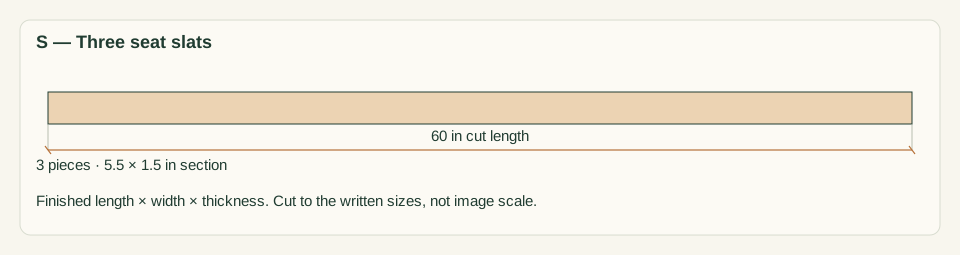
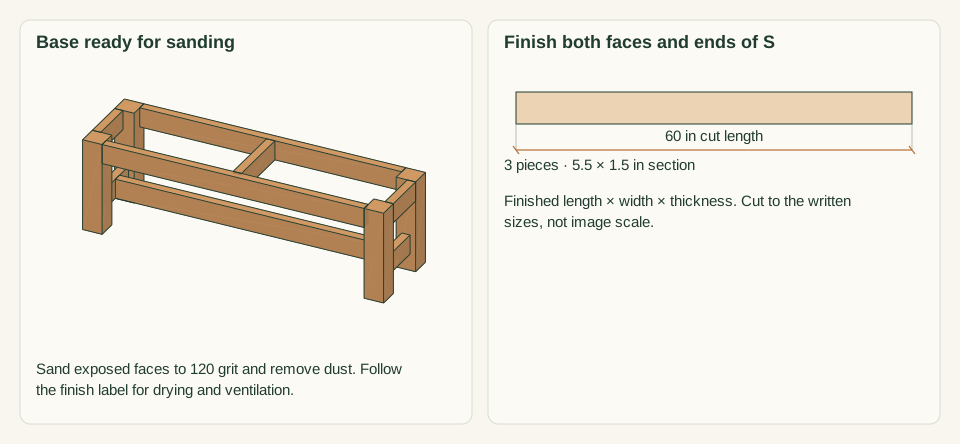
| S — Seat slat | 3 | 60 × 5.5 × 1.5 in | Finished length × width × thickness; square ends unless the detail says otherwise. |
Tools
- Tape measure, combination square, pencil and 48 in level or straightedge
- Guarded saw able to cut 3.5 in stock square, with a supported cutting station
- Pocket-hole jig with matching stepped bit and long driver bit
- Drill/driver, pilot bit and countersink matched to the slat screws
- Four or more clamps, including two face clamps for pocket-hole joints
- Two 0.25 in spacer blocks, sanding block and 120-grit abrasive
Protective gear
- Eye protection during cutting, drilling and sanding
- Hearing protection during sawing
- Dust mask or respirator suited to cedar dust
- Closed footwear; no loose gloves or sleeves near the saw blade or drill bit
04 / Put it together
Build steps
- 01
Confirm the site and intended use
Choose a firm, level surface at least 60 × 17 in plus about 30 in clear on each long side. Lay a straightedge and level across a 54 × 15 in area where the legs will stand. Check both directions and the diagonals.
Close-up · Whole model shows the complete part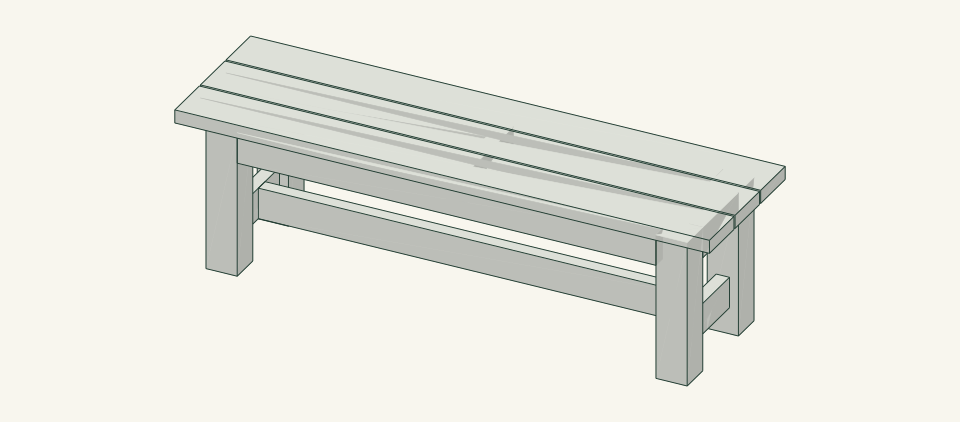
Loading the 3D view…
Drag to turn. Pinch or use + / − to zoom. The written step covers workholding and tool use.
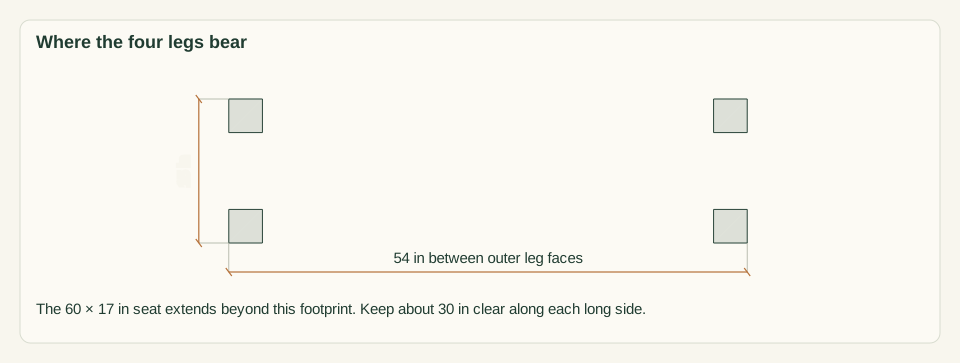
Scroll or swipe the enlarged drawing to read its dimensions. Choose Fit to see the whole drawing again.
The leg footprint is smaller than the seat. Check the supporting surface and leave access beside both long edges.
Check: The surface is firm, level within the level bubble, and has no drop or edge within reach of the bench.
- 02
Inspect and measure the stock
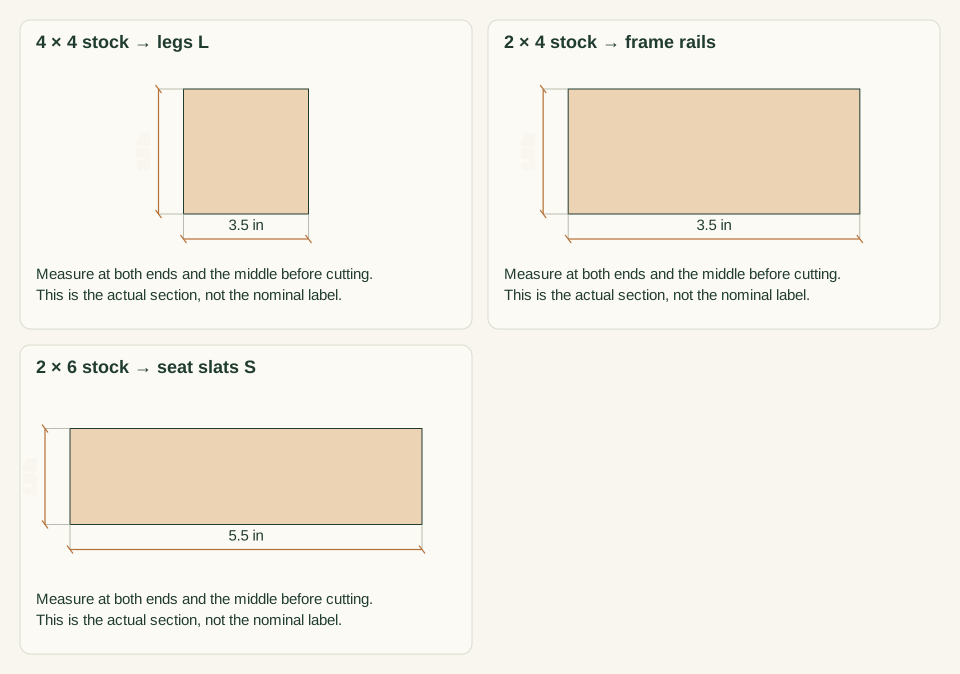
Measure every board at both ends and the middle. The 4 × 4 must be 3.5 × 3.5 in, the 2 × 4 boards 1.5 × 3.5 in and the 2 × 6 boards 1.5 × 5.5 in. Reject boards with splits within 6 in of an end, twist, loose knots or more than 0.125 in bow.
Close-up · Whole model shows the complete part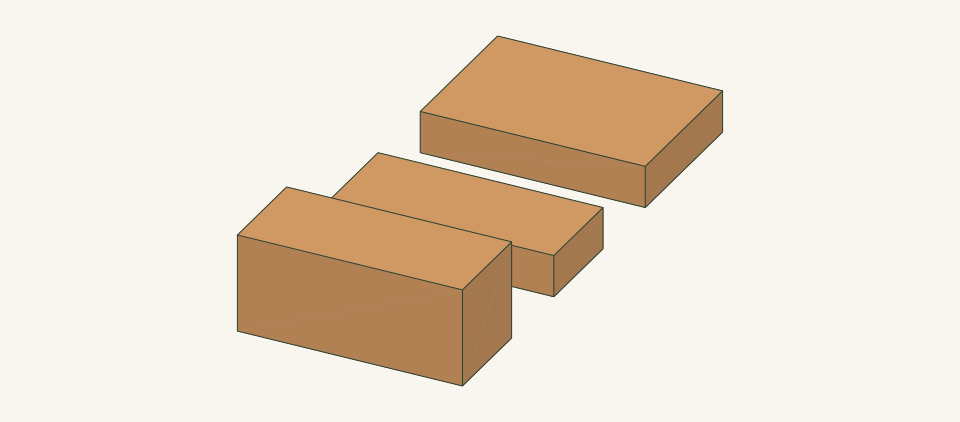
Loading the 3D view…
Drag to turn. Pinch or use + / − to zoom. The written step covers workholding and tool use.
Scroll or swipe the enlarged drawing to read its dimensions. Choose Fit to see the whole drawing again.
Compare the three stock sections before cutting. The 3D samples are shortened for inspection; they are not cut lengths.
Check: All sections match the parts table, or work stops until the cut lengths are worked out again for the stock you have.
- 03
Cut the legs and frame rails
Square one end of each board first. From the 4 × 4, cut four legs L at 16.5 in. From 2 × 4 board 1, cut R at 47, E at 8, E at 8 and C at 12 in. From board 2, cut R at 47, B at 8 and B at 8 in. From board 3, cut T at 49 in. Label every part and chamfer the leg bottoms 0.25 in.
Close-up · Whole model shows the complete part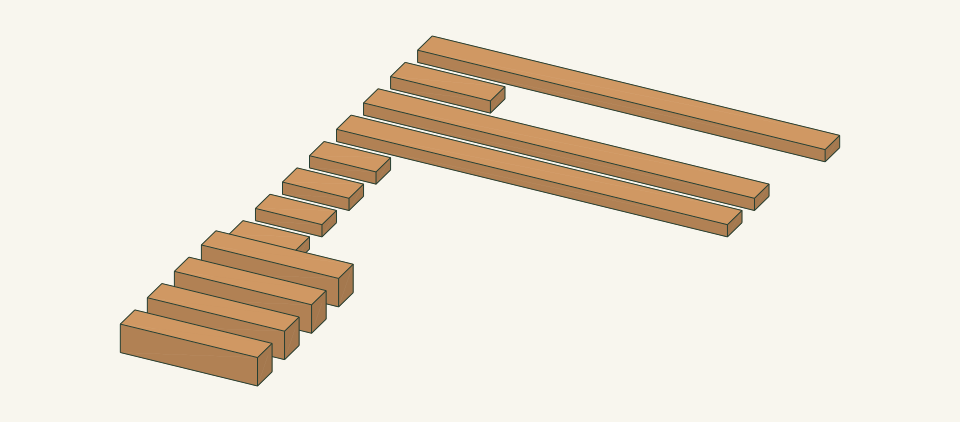
Loading the 3D view…
Drag to turn. Pinch or use + / − to zoom. The written step covers workholding and tool use.
Scroll or swipe the enlarged drawing to read its dimensions. Choose Fit to see the whole drawing again.
Cut and label the twelve frame components. Loose spacing is illustrative; no seat slat belongs to this operation.
Check: Paired parts match within 0.0625 in and every cut end is square to the face and edge.
- 04
Cut the seat slats
Square one end of each 2 × 6 board, then cut three slats S at 60 in, one per board. Choose the best face as the seat face and mark it. Ease the seat-face edges and the cut ends with a 0.125 in round-over or sanding block.
Close-up · Whole model shows the complete part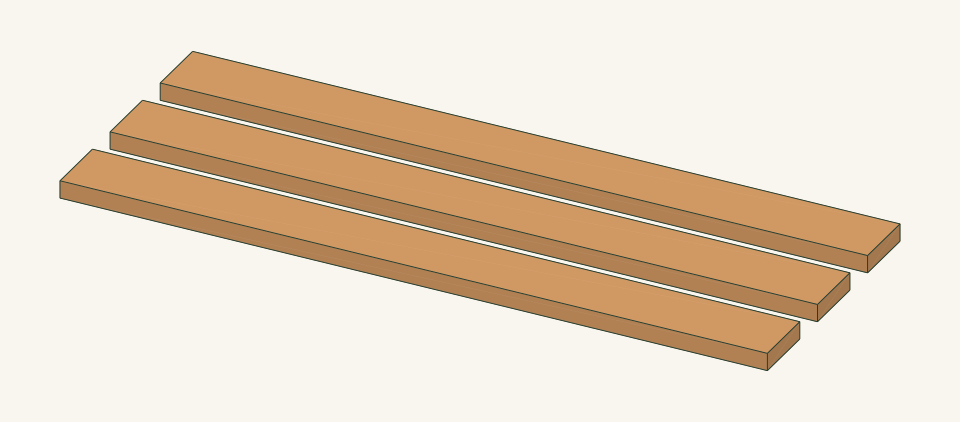
Loading the 3D view…
Drag to turn. Pinch or use + / − to zoom. The written step covers workholding and tool use.
Scroll or swipe the enlarged drawing to read its dimensions. Choose Fit to see the whole drawing again.
Three separate seat slats, not an assembled seat. Mark the best face and ease the exposed edges.
Check: Three slats lie flat face to face with ends within 0.0625 in and no splinters on the seat face.
- 05
Drill the pocket holes
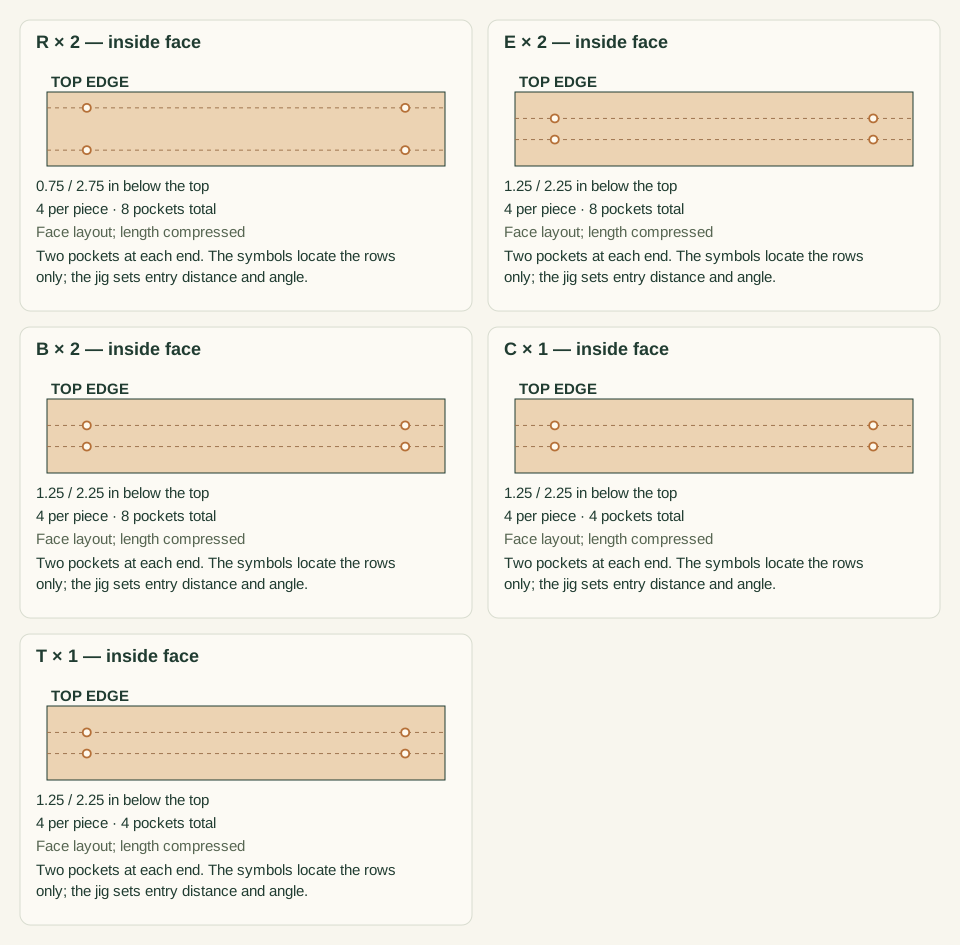
Set the pocket-hole jig and drill collar for 1.5 in stock per the jig instructions. On the inside face of each R, drill two holes at each end, 0.75 and 2.75 in below the top edge. On E, B, C and T, drill two holes at each end at 1.25 and 2.25 in below the marked top edge. Drill 32 holes in total.
Close-up · Whole model shows the complete part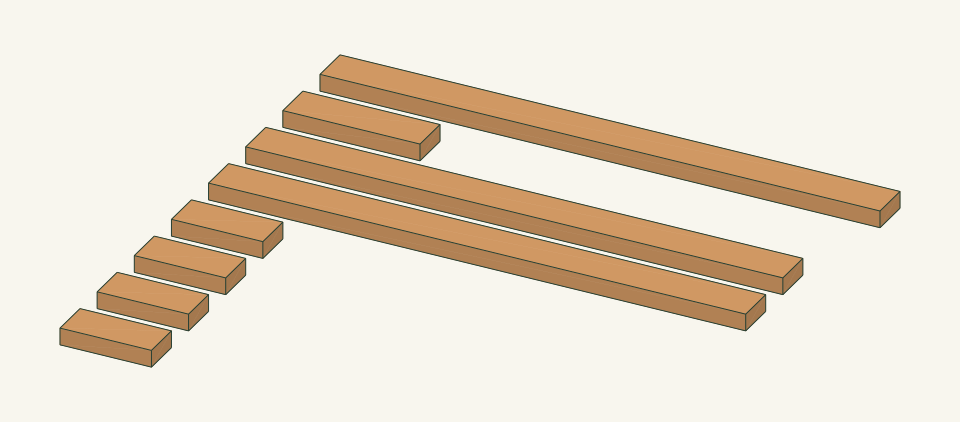
Loading the 3D view…
Drag to turn. Pinch or use + / − to zoom. The written step covers workholding and tool use.
Scroll or swipe the enlarged drawing to read its dimensions. Choose Fit to see the whole drawing again.
32 pocket locations on eight loose rails. Mark the inside face and top edge; set the jig for 1.5 in stock.
Check: Count 32 holes, each on an inside face, with no hole breaking out through an outside face or edge.
- 06
Assemble the two end frames
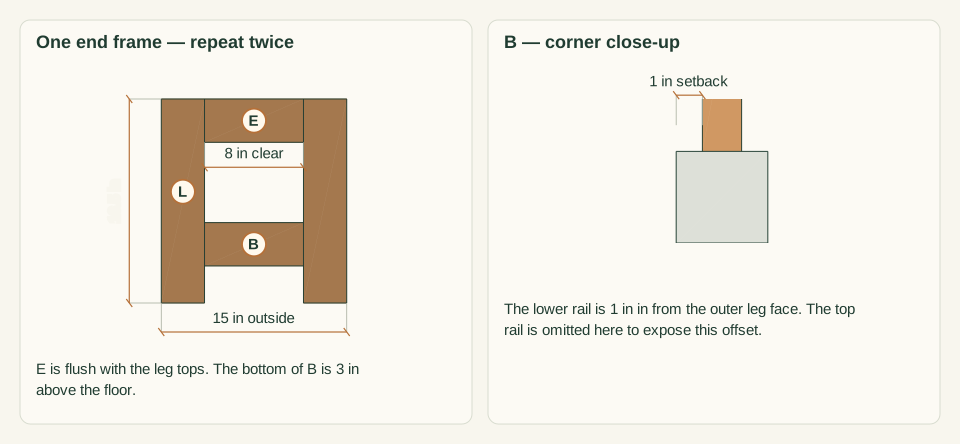
Lay two legs L on a flat bench, 8 in apart between inner faces. Clamp E between them with its top edge flush to the leg tops and its outer face flush to the leg end faces. Clamp B centered on the leg width, 1 in in from the leg end faces, with its bottom edge 3 in above the leg bottoms. Drive 4 screws into each rail. Repeat for the second end frame, using 16 screws in total.
Close-up · Whole model shows the complete part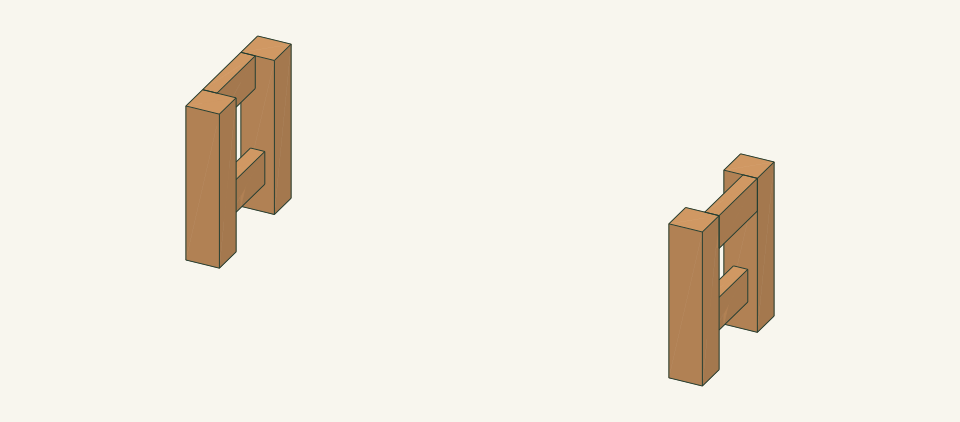
Loading the 3D view…
Drag to turn. Pinch or use + / − to zoom. The written step covers workholding and tool use.
Scroll or swipe the enlarged drawing to read its dimensions. Choose Fit to see the whole drawing again.
Build two matching end frames. E is flush at the top; B sits lower and is set back from the outer leg face.
Check: Each end frame is 15 in wide outside, its two diagonals match within 0.0625 in, and all rail edges sit flush.
- 07
Join the side rails and square the frame
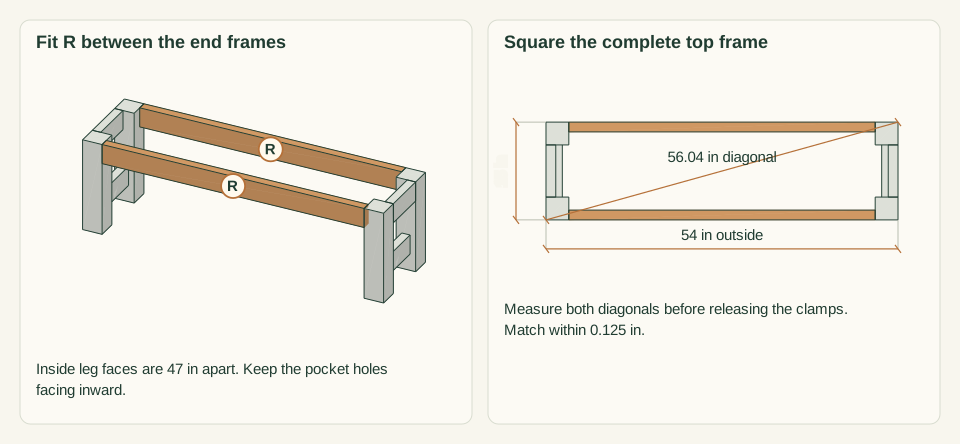
With a helper holding the end frames upright, stand them on the flat surface 47 in apart between inner leg faces. Clamp each R between the legs, top edge flush to the leg tops and outer face flush to the leg outer faces, with pocket holes facing in. Drive 8 screws. Measure both top diagonals across the 54 × 15 in outside before the clamps come off.
Close-up · Whole model shows the complete part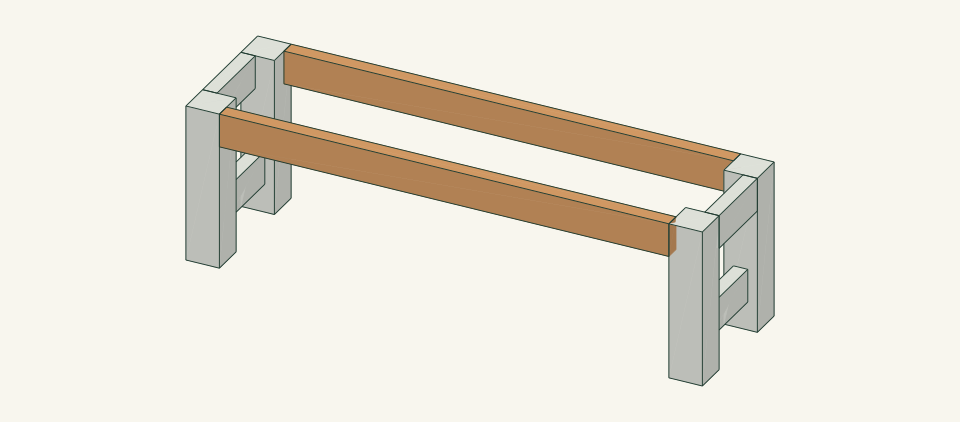
Loading the 3D view…
Drag to turn. Pinch or use + / − to zoom. The written step covers workholding and tool use.
Scroll or swipe the enlarged drawing to read its dimensions. Choose Fit to see the whole drawing again.
Add both long side rails now. Warm color identifies R; the two end frames remain visible as context.
Check: Top diagonals read 56.04 in and match within 0.125 in; all four leg tops are flush with the rails.
- 08
Fit the center cleat and lower stretcher
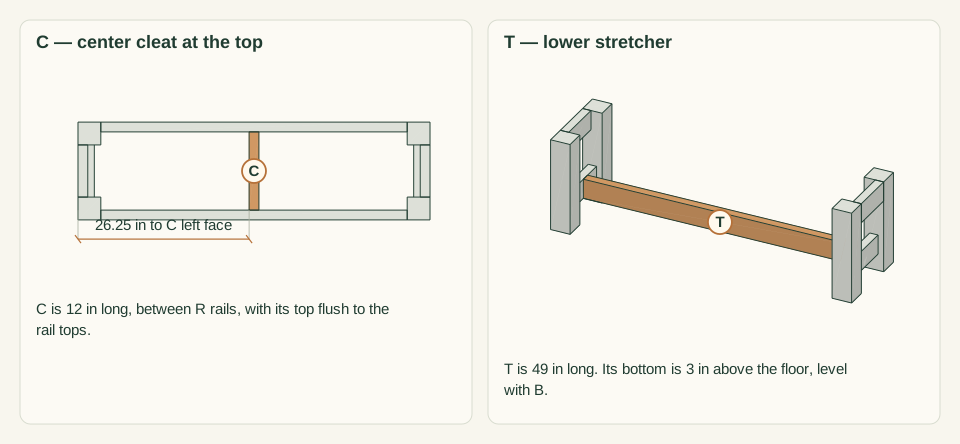
Clamp C between the R rails with its left face 26.25 in from the left leg outer faces and its top flush with the R tops. Drive 4 screws. Clamp T between the B rails, 3.25 in from each B end and level with B, with its bottom edge 3 in above the floor. Drive 4 screws.
Close-up · Whole model shows the complete part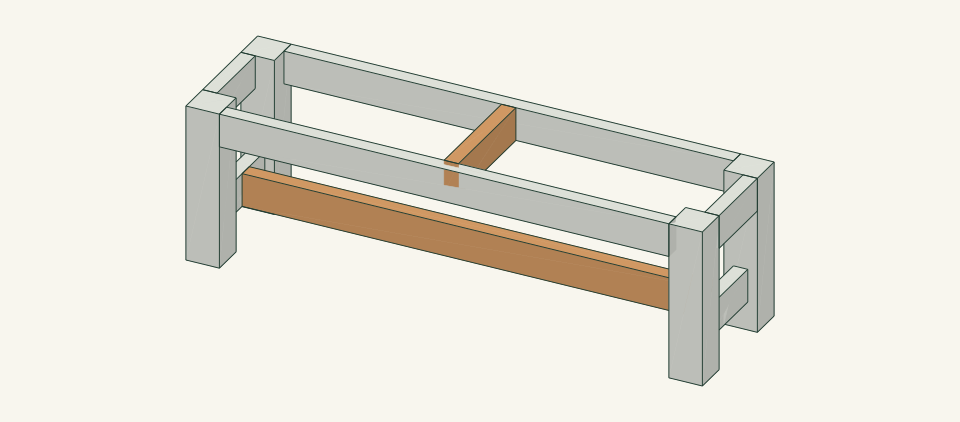
Loading the 3D view…
Drag to turn. Pinch or use + / − to zoom. The written step covers workholding and tool use.
Scroll or swipe the enlarged drawing to read its dimensions. Choose Fit to see the whole drawing again.
C supports the center of the seat; T connects the two lower rails. They are different lengths and sit at different heights.
Check: All four feet touch the flat surface, the frame does not rock, and C sits flush with the R tops.
- 09
Sand and finish the parts
Sand all exposed faces to 120 grit and remove dust. If using an exterior finish, coat every face of the frame and all faces of the three slats, including undersides and the leg end grain. Let it dry for the full time on the product label.
Close-up · Whole model shows the complete part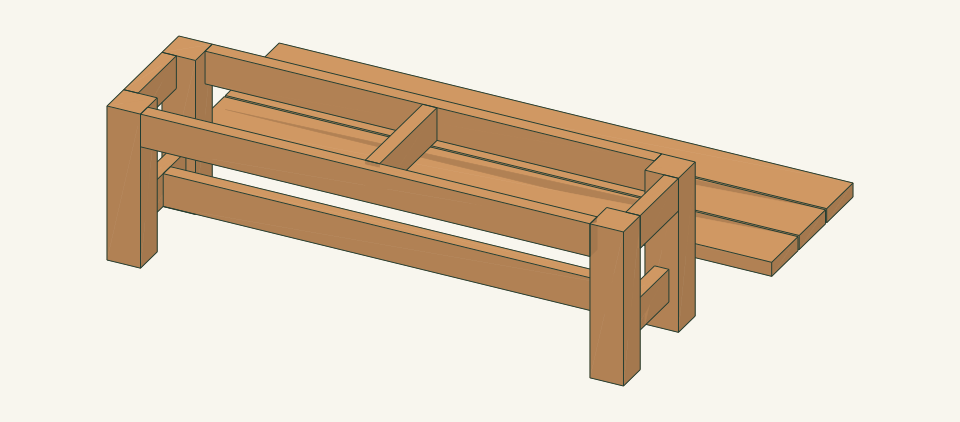
Loading the 3D view…
Drag to turn. Pinch or use + / − to zoom. The written step covers workholding and tool use.
Scroll or swipe the enlarged drawing to read its dimensions. Choose Fit to see the whole drawing again.
Finish the assembled base and the three loose slats before attaching the seat. Slats are separated here for access, not moved to a new construction position.
Check: The finish is dry to the label standard and no raw end grain remains on the leg bottoms.
- 10
Fasten the seat slats
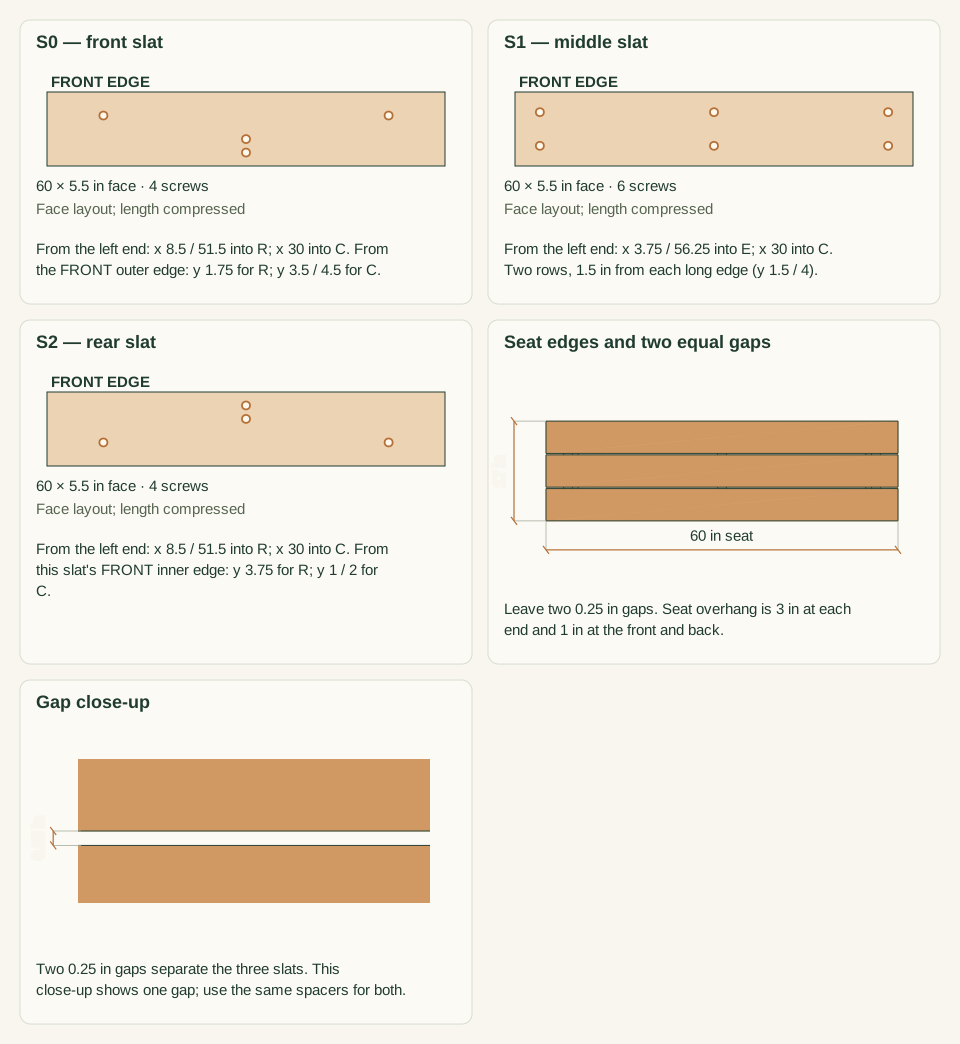
Lay S0, S1 and S2 on the frame with two 0.25 in spacers between them. Set each slat end 3 in past the leg outer faces and each outer edge 1 in past the leg faces. Mark the 14 screw points, measuring x from the slat's left end. S0 and S2: two screws into R at x 8.5 and 51.5, 1.75 in in from the slat's outer edge, and two into C at x 30, 1 and 2 in in from the slat's inner edge. S1: two screws into each E at x 3.75 and 56.25, and two into C at x 30, each 1.5 in in from a slat edge. Pilot, countersink and drive the screws, keeping the screws at x 3.75 and 56.25 on S1 centered over E.
Close-up · Whole model shows the complete part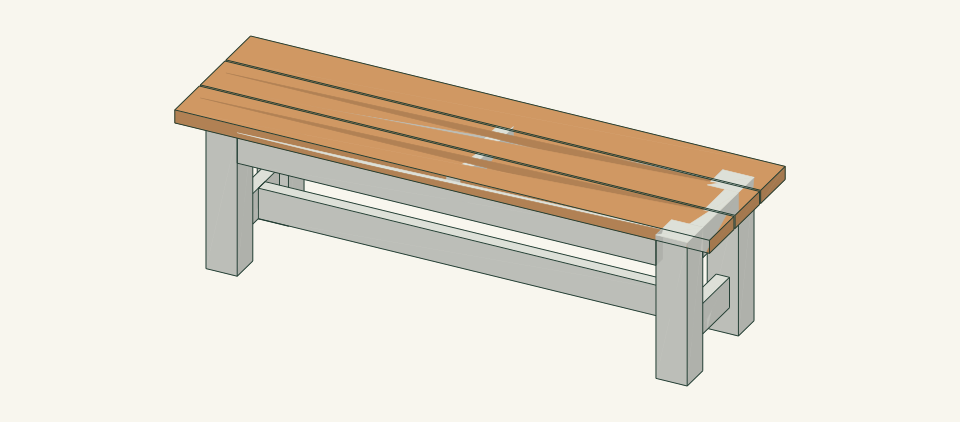
Loading the 3D view…
Drag to turn. Pinch or use + / − to zoom. The written step covers workholding and tool use.
Scroll or swipe the enlarged drawing to read its dimensions. Choose Fit to see the whole drawing again.
14 seat screws: four in S0, six in S1, four in S2. Each pattern names the receiving rail and its measuring edge.
Check: The seat measures 60 × 17 in, both gaps are 0.25 in, and every screw head sits just below the seat face.
- 11
Place and check the bench
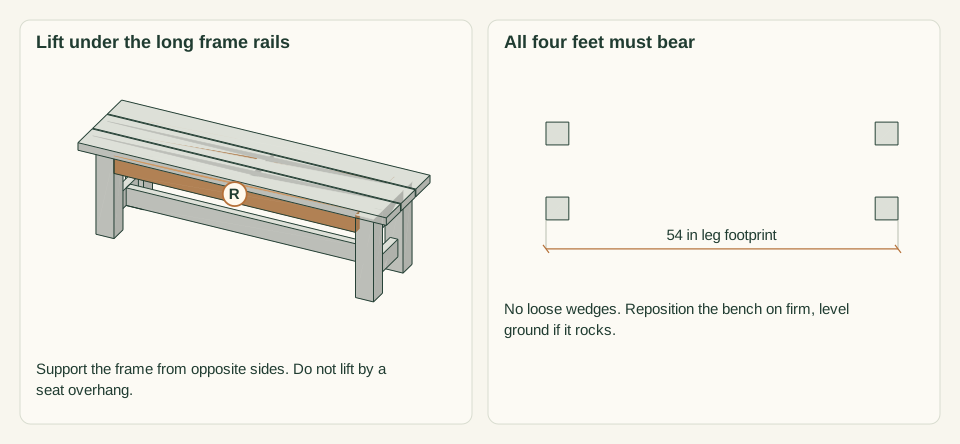
With two people, lift the bench by the R rails, not by a slat end, and set it on the checked site. Press down on each corner of the seat in turn. Do not use loose wedges under a leg. Regrade or move the bench to firmer ground if it rocks.
Close-up · Whole model shows the complete part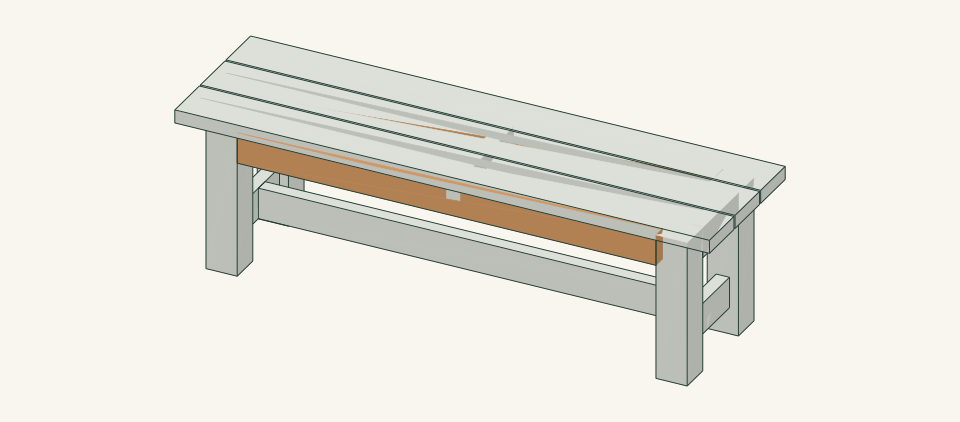
Loading the 3D view…
Drag to turn. Pinch or use + / − to zoom. The written step covers workholding and tool use.
Scroll or swipe the enlarged drawing to read its dimensions. Choose Fit to see the whole drawing again.
Two people lift at R, not at the projecting slat ends. Set all four legs on the checked supporting surface.
Check: All four legs bear on the surface with no rocking when each corner is pressed.
- 12
Inspect before first use
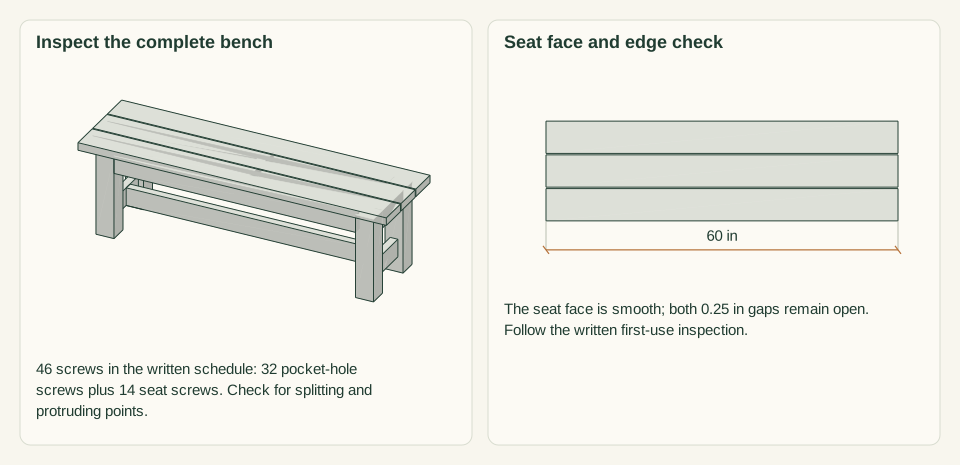
Check all 46 screws for seated heads and no tips breaking the surface. Check every leg and rail joint for gaps and every slat end for splits. Run a hand over the seat face and edges. Sit near the center for the first test, then try each end over the legs.
Close-up · Whole model shows the complete partLoading the 3D view…
Drag to turn. Pinch or use + / − to zoom. The written step covers workholding and tool use.
Scroll or swipe the enlarged drawing to read its dimensions. Choose Fit to see the whole drawing again.
Final inspection: check the seated heads, joints, slat ends and all four feet. A rendered model is not evidence of a load test.
Check: No joint gap, split, protruding point or rocking is found.


05 / Keep it sound
Care
After the build
- Place the bench on the checked site with all four legs bearing and no wedges under the feet.
- Sit near the center first. Do not sit alone on the 3 in end overhang, stand on the seat or use it as a step.
Check it each season
- Each season, check all 46 screws, every frame joint and each slat end. Tighten loose screws only when the bench is unloaded.
- Replace a split slat or rail rather than adding screws beside the split. Recoat the finish when water no longer beads on the seat, following the product label.
- Clear leaves from the slat gaps and keep the leg bottoms off standing water.
If something looks wrong
- Bench rocks on one corner
- Move it to a level spot or regrade the surface; check that a leg has not loosened from its rails.
- Frame racks or a rail joint opens
- Stop using the bench. Unload it, reclamp the joint flush and square, then replace any stripped pocket screw or damaged part.
- Slat splits at a screw
- Remove the slat and cut a replacement at 60 in. Pilot and countersink before driving the screws.
- Slat gaps close or open after weather
- Check for cupping; replace a slat that no longer bears on R, E or C along its full width.
- Screw head rises above the seat
- Reset it below the surface. Replace the screw if it no longer holds.
Keep exploring